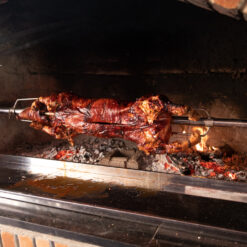
The only reliable way to know if a whole pig is done is with a food thermometer. Check the temperature in the three thickest parts: the shoulder, the ham, and the loin. Make sure the probe doesn’t touch bone. Once all three zones reach their target temperature and the pig has rested, it’s ready. For a detailed guide on where to probe, see our Temperature map. For more on timing, visit our Time by Weight guide.
While experienced pitmasters use visual cues, they only do so to support what their thermometer tells them. For a large, expensive piece of meat like a whole pig, guessing is not an option. A thermometer is your only guarantee of both safety and quality.
Contrary to popular belief, the color of the meat or the clarity of its juices are not reliable indicators of doneness. Pork can remain pink even when it has reached a safe internal temperature, a phenomenon known as “persistent pinking”. Likewise, juices may run clear long before the meat is safe to eat. Trust your thermometer, not your eyes.
Leave-In Probe: This thermometer is placed in the thickest part of the shoulder at the start of the cook. It monitors the temperature continuously, allowing you to track progress without lifting the lid.
Instant-Read Thermometer: This is your verification tool. Use it in the final stages to quickly check multiple spots (shoulder, ham, loin) and confirm the entire animal is ready.
Knowing where to probe is as important as using a thermometer.
These three areas are the thickest and slowest-cooking parts of the pig. If they are done, everything else is too.
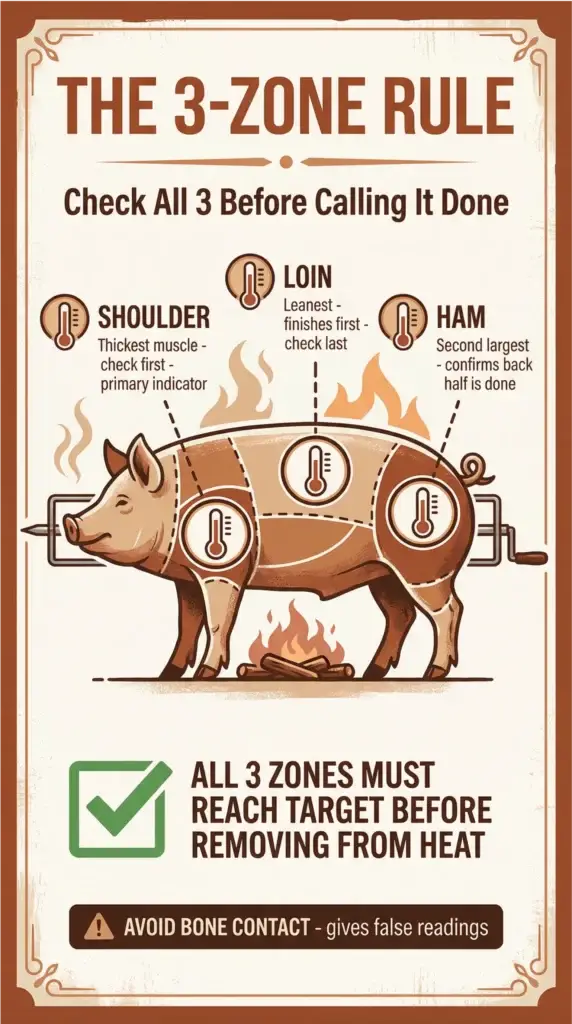
Bone conducts heat differently than muscle, so touching it with your probe will give you a false reading. Insert the thermometer into the very center of the muscle. For a complete guide on probe placement, see our Temperature map.
Different countries have slightly different recommendations, but both prioritize safety.
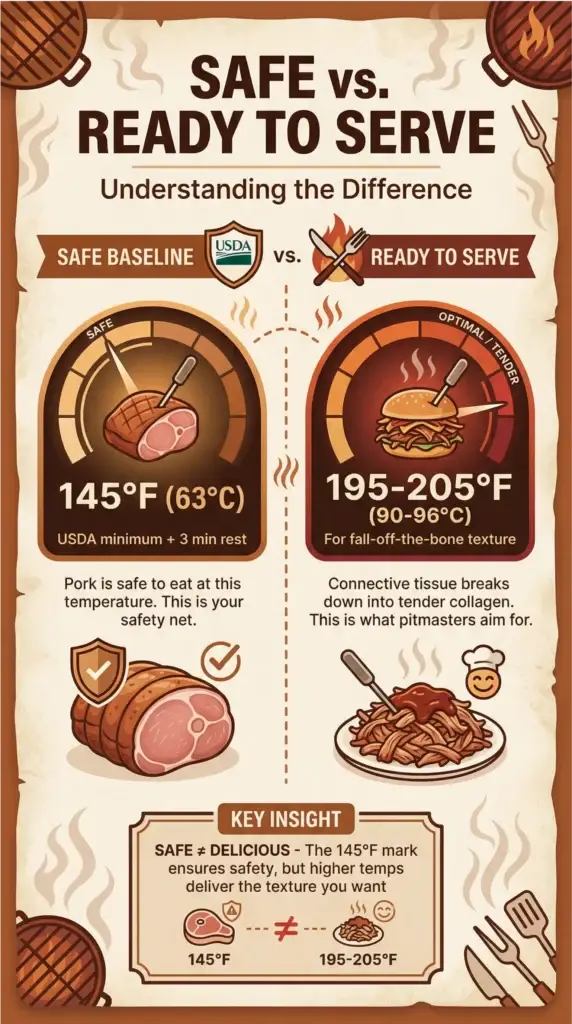
The United States Department of Agriculture (USDA) states that fresh pork, including whole pig roasts, is safe to eat when cooked to a minimum internal temperature of 145°F (62.8°C) and then allowed to rest for at least three minutes.
Health Canada recommends a slightly higher internal temperature of 160°F (71°C) for pork pieces and whole cuts. This provides an extra margin of safety. Both temperatures are considered safe; the choice often comes down to texture preference.
There’s a big difference between when a pig is safe to eat and when it’s truly delicious.
At 145°F, the pork is safe, but the tough connective tissues in the shoulder and ham have not yet broken down into tender, juicy collagen. For that fall-off-the-bone texture, most pitmasters aim for a much higher internal temperature, often between 195°F and 205°F.
Different muscles cook at different rates. The lean loin will always finish before the fatty, dense shoulder. Furthermore, after you remove the pig from the heat, its internal temperature will continue to rise by 5-15 degrees—a process called carryover cooking. This is why you must check multiple zones and rest the meat before carving.
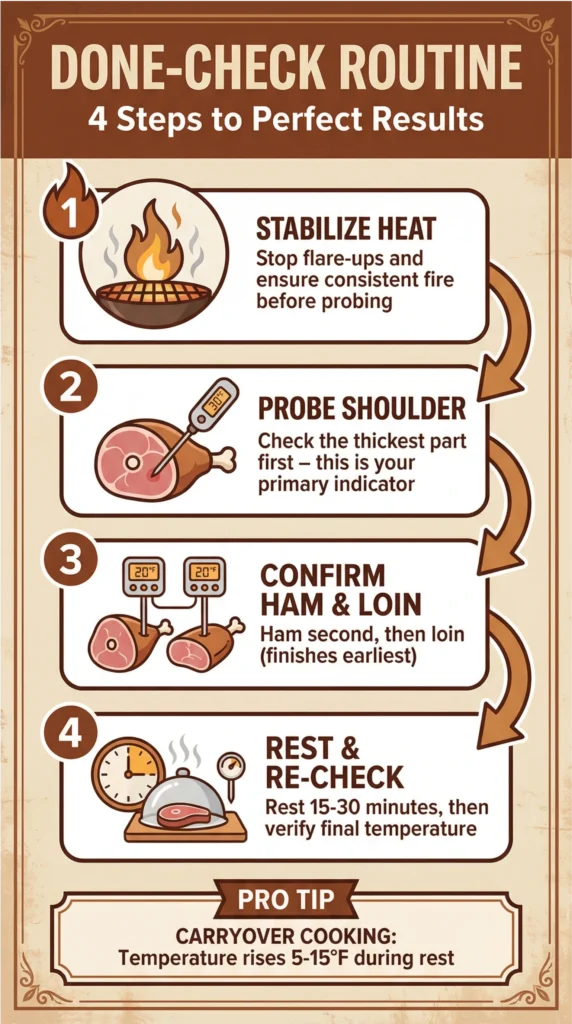
Follow this routine for perfect results every time.
Before probing, make sure your fire is stable and there are no active flare-ups, which can create hot spots and throw off your readings.
This is your primary indicator. If the shoulder isn’t ready, nothing is.
Once the shoulder is close to your target, check the ham. Finally, check the loin to ensure it hasn’t overcooked.
Let the pig rest for at least 15-30 minutes before carving. This allows the juices to redistribute and for carryover cooking to finish. A final temperature check after the rest confirms it’s ready to serve.
These cues can support your thermometer readings.
The skin should be a deep, golden-brown and should feel crispy and tight. If it’s still pale or soft, it needs more time.
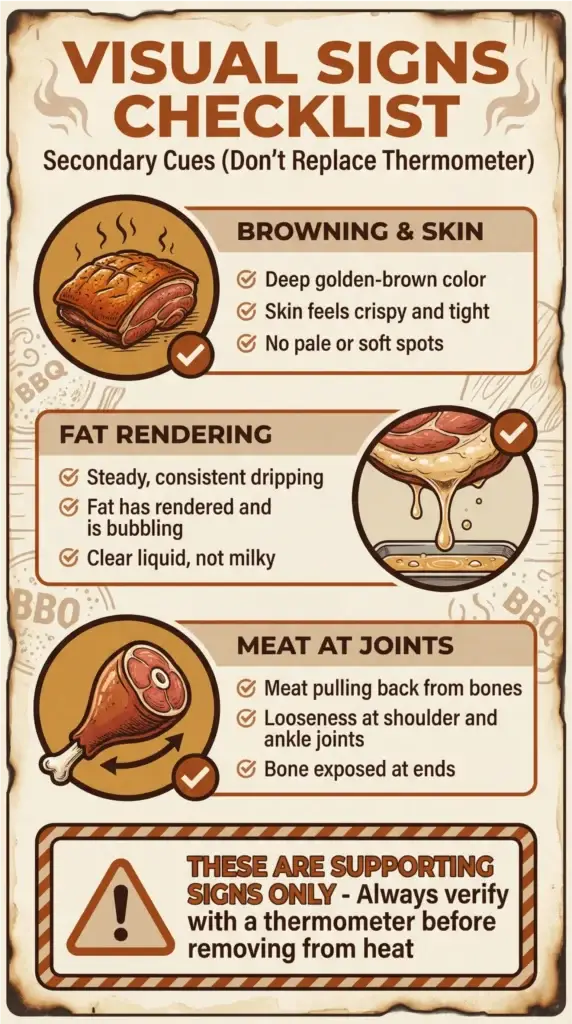
As the pig cooks, fat will render and drip out. A steady, consistent drip is a good sign that the internal temperature is rising.
When the pig is nearing doneness, the meat around the joints (especially the shoulder and ankle) will start to pull back, exposing the bone.
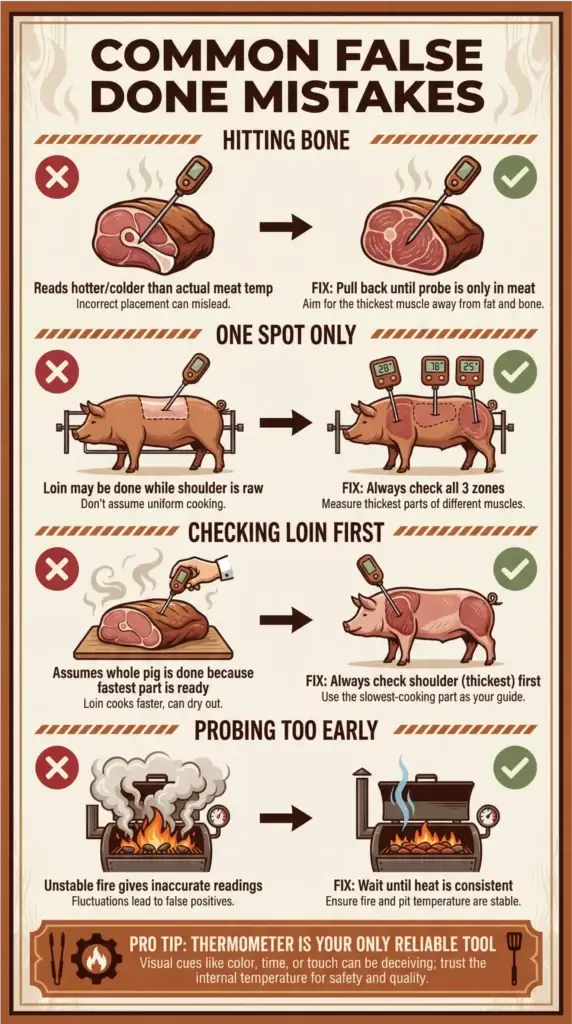
| Mistake | What Happens | Fix |
| Hitting Bone | The thermometer reads a falsely high temperature. | Pull the probe back until it is only touching meat. |
| Only Checking One Spot | You pull the pig off when the loin is done, but the shoulder is still undercooked. | Always check all three zones (shoulder, ham, loin). |
| Checking the Loin First | You assume the whole pig is done because the fastest-cooking part is ready. | Always check the thickest part (shoulder) first. |
| Probing Too Early | You get an inaccurate reading because the fire isn’t stable. | Wait until the heat is consistent and there are no flare-ups. |
| Zone | Where to Probe | What a Good Reading Means | What to Do If It’s Not There Yet |
| Shoulder | Deepest part of the muscle. | The pig is likely ready or very close. | Keep cooking. This is the last part to finish. |
| Ham | Thickest part of the rear leg. | The back half of the pig is done. | Continue cooking until the shoulder is also done. |
| Loin | Center of the back muscle. | The leanest part is ready. | Shield the loin with foil to prevent it from drying out while the shoulder finishes. |
The USDA recommends a minimum of 145°F (62.8°C) with a 3-minute rest. Health Canada recommends 160°F (71°C).
At least three: the shoulder, the ham, and the loin.
The loin is a leaner, thinner muscle and cooks much faster than the dense, fatty shoulder.
Yes. Resting for 15-30 minutes allows the juices to redistribute, resulting in a more flavorful and moist final product.
This is called “the stall” and is normal. It happens when moisture evaporating from the surface cools the meat. Be patient and maintain a steady fire; the temperature will eventually start to rise again.
Back to the main guide: Complete Step-by-Step Guide
More on temperature zones: Temperature map for whole pig
Timing by weight: Time by Weight: How Long to Roast a Whole Pig